Step 3. The images are obtained
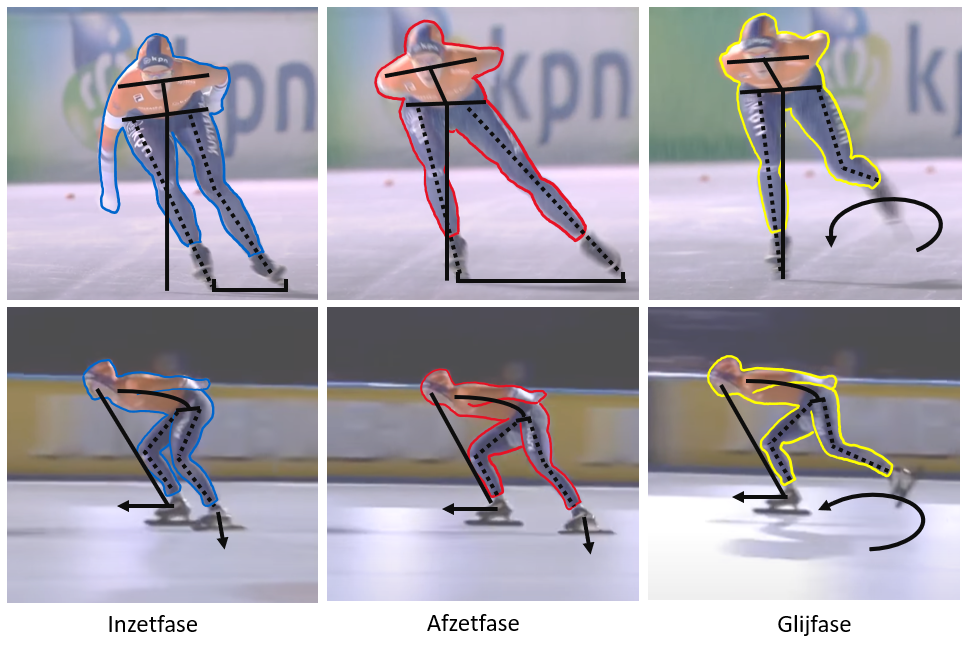
Step 4. The analysis is started with lines (come on ha-ha, grown boys…) and pay attention to the following things.
We have put a number of lines and comments on one of the Netherlands' most impressive technical skaters, Kjeld Nuis. This is just to get an idea of which line stands for what. The technique of skating initially starts with good posture. This is particularly easy to analyze in a side view. For a good posture, we pay attention to the following points:
– The corners of the knees 90 degrees
– Hips tilted forward
– The shoulders in a relaxed state
– The pressure on the foot should be in the middle
The following things can be observed in the rear view:
– The shoulders and hips are parallel to the horizon
– The iron is perpendicular to the horizon line
These are the points to pay attention to for posture. In case you see in your own analysis that you do not meet the criteria mentioned above, then here are one or more tips for each part to practice this.
– For corners of the knees 90 degrees one can make in a reflective medium (e.g. a window or a mirror) analyze itself. By paying attention during the skating pass, during leg placement, landing 'deep' can solve the problem of sitting 'high'
– To tilt the hips forward and tilt, one must tense the lower muscles of the abdomen. There are a number of statements that try to describe exactly how this attitude works.
- Tighten abdominal muscles
- Tilt hips
- Point the anus to the floor
- Push cock into the side/forward
- Like sitting on the toilet
- Pull tail between your legs
Finally. Enough statements, it could also help to work with a reflective medium during drying training.
– Shoulders should not be forward, pressed down or behind. Above all, there should be no tension. After the start, one often sees that the shoulder is pulled up convulsively. As a result, less pressure is generated on the ice and sales also become frenetic.
– To test whether the pressure is good under the foot, the following can be done. You assume the skating position. In general, the pressure is initially on the forefoot. By sitting deep and moving the butt back more, there is more pressure to the heel. This can be tested by pulling up the toes. If this is possible the pressure is far enough behind. In the ideal situation, the pressure is somewhere between the heel and the arch of the foot. The orientation of the blade of the skate can also be trained. If it's not right under the foot, it could be related to a number of things. The first option is that the small muscles in the ankle are not yet developed enough to position the skate properly under the foot. A second option could be that the skate boots do not provide enough support to get the blade right under the foot with the foot and ankle. For option number 3 could it be the position of the iron under the foot. By doing stability exercises on one leg, you can train the muscles in the ankle. By on an uneven or soft surface (e.g. A matrass) to stand on one foot, the muscles are already quite challenged.
Some other tips to check the posture of yourself is whether the nose-knee-toe are in one line while skating. In the pictures of the side view you can see that a dotted line has been drawn through Ireen's shin. If this is continued, the line will end at her nose. This can be used to check whether you lean forward or backward enough.
Bon. This was briefly the attitude and the tips we could give.